How to reduce the threshold for “Low on Space” Android Warnings

Low on Space – Phone storage space is getting low.

Its a cursed message on my Android HTC Hero, but there is 16MB free on /data partition! I want my email to sync a bit more and I want to receive text messages and I dont want to delete any apps.

You need to have rooted your android device and have the android sdk installed and debugging enabled on your phone. I might package this recipe up into an apk for easy installation.

The default limit is 10% of free space, i’ve reduced mine to 5%, I don’t know if there are any terrible side effects. As you’ve already rooted your phone you’ve already probably voided your warranty 🙂

To reduce from 10% to 5% warning from your “adb shell”:

sqlite3 /data/data/com.android.providers.settings/databases/settings.db
insert into secure (name, value) VALUES('sys_storage_threshold_percentage','5');
insert into gservices (name, value) VALUES('sys_storage_threshold_percentage','5');
.quit

Then reboot your phone.

Some firmwares seem to look for the setting in gservices but the latest android source looks like it looks for it in the secure settings, so i’ve included both for good measure.

How to get rid of GPG NO_PUBKEY errors when doing apt-get update

When doing apt-get update you might see a lot of errors like

W: GPG error: http://ceph.newdream.net lenny Release: The following signatures couldn't be verified because the public key is not available: NO_PUBKEY DA4420ED288995C8
W: GPG error: http://download.opensuse.org Release: The following signatures couldn't be verified because the public key is not available: NO_PUBKEY 85753AA5EEFEFDE9
W: GPG error: http://ppa.launchpad.net karmic Release: The following signatures couldn't be verified because the public key is not available: NO_PUBKEY 28577FE31F882273
W: GPG error: http://download.virtualbox.org lenny Release: The following signatures couldn't be verified because the public key is not available: NO_PUBKEY 54422A4B98AB5139

For the best part you should install the apropriate keyrings

apt-cache search keyring$

should list most of them, sometimes they dont exist for some third party repositories, so try this one liner, split for (a little) clarity

for KEY in `apt-get update 2>&1 |grep NO_PUBKEY|awk  '{print $NF}'`; do
 gpg --keyserver subkeys.pgp.net --recv $KEY; gpg --export --armor $KEY|apt-key add -;
done

Caveat, this is insecure, but more secure than disabling validation. Please be aware for full security you should validate the key signatures you are importing via private quantumly secured links to the originator obtained at your own cost, etc etc.

How to generate an svn-authors-for-git file automatically

If you are using git-svn to interoperate or migrate to git from an svn repository it is a bit irritating having your long git svn fetch repeatedly interrupted by unknown users in your svn repo.

This bash script one liner will get you started with a template file with every user in it already, just tweak their names if you wish.


svn log svn://svnserver -q|grep -v -- ---|cut -d\| -f 2|sort|tr -d ' '|uniq|
   xargs -i echo '{} = {} <{}@example.com>' > /pathto/svn-authors-for-git

git config --global --replace-all svn.authorsfile /pathto/svn-authors-for-git

Can Anyone Explain My Gas Bill Power Discrepancy

I’ve been trying to figure out how much my gas / heating / showers were costing me, but I’ve hit a fairly big discrepancy that I can’t explain.

I have a brand new 28kW/h rated boiler, with 98% efficiency rating, and according to the service manual it will consume 28.57kW/h max worth of gas, or 3.02 m^3 per hour.

I have found through measurement of having a 7 minute hot shower that the boiler was running full whack, consuming exactly at the rate claimed by the guide, 3.02 m^3, but this equates according to my bill to be 34 kW/h.

Where is the extra energy going / being wasted?

Boiler Stats Value Units
Gas Max Flow Rate 3.02 m^3/hr
Max Heat In: 28.57 kW/h
Max Heat Out: 28 kW/h
(Calculated Efficiency) 98.0049002450122 %
Meter Readings
Used 12.5 ft^3
Duration 7 min
Metric Conversion 0.35375 m^3
Flow Rate 3.03214285714286 m^3/hr
Gas Qualities / Constants
Calorific Value 39.7
Conversion Factor 1.02264
kW/h / MJ 3.6

kW/h at Max Flow = Max m^3/h (3.02) * Calorific Value (39.7) * Conversion Factor (1.02264) / kWh per MJ (3.6)

kW/h at Max Flow = 34.0578889333333

Validating and Exploring DNSSEC with dig

Now that the Root DNS nameservers and .org TLD have both been signed, you can validate DNS server responses are legitimate.

In an attempt to learn better how this all hangs together, I thought I’d first try and validate some requests.

My first difficulty was figuring out what the root nameserver key is, what format it needs to be in, where you store it, and how to use it with dig to validate. Of course, the keys themselves are stored in DNS, you can query them in the format DIG needs to read them back with the command:

dig +nocomments +nostats +nocmd +noquestion -t dnskey . > trusted-key.key

This can be placed in /etc/trusted-key.key if desired for site-wide dig use, or else it will search the current directory for it.

If the file cannot be parsed, dig when you try to use it in dnssec mode will print:

No trusted keys present
or
;; No trusted key, +sigchase option is disabled

To test out a full chain of validation from the root, you can now try to resolve www.isc.org

dig +topdown +sigchase +multiline -ta www.isc.org

-- snip --

;; OK a DS valids a DNSKEY in the RRset
;; Now verify that this DNSKEY validates the DNSKEY RRset
;; VERIFYING DNSKEY RRset for isc.org. with DNSKEY:12892: success
;; VERIFYING A RRset for www.isc.org. with DNSKEY:7617: success
;; The Answer:
www.isc.org.		600 IN A 149.20.64.42

;; FINISH : we have validate the DNSSEC chain of trust: SUCCESS

Hooray, we have validation.

BitCoin Bugzilla Extension v0.1 Released

I was fascinated by the concepts behind BitCoin, one of the things it really needs
was trade to give the currency value. So I’ve started writing a plugin for BugZilla, to allow people to donate bitcoins to
various bugs in order to sponsor / vote / show their appreciation for the bug fixes and enhancements.

Source/Download: http://github.com/darkskiez/bitcoinbugzilla/archives/v0.1

GitHub: http://github.com/darkskiez/bitcoinbugzilla

Bugtracker: http://bugzilla.darkskiez.co.uk

Blog is now IPv6 Enabled

Although my awesome hosting company dreamhost are not serving up via IPv6 yet, I’ve IPv6 enabled by blog for them by using apache reverse proxy on my home machine.

I configured apache much like: http://linux.yyz.us/ipv6/proxy.html with a few differences

1. I didnt use NameVirtualHost, just put a specific IP in. NameVirtualHosts just feel a bit unnecessary with IPv6, and this way i can point several aliases at the entry without defining them all. This may be considered a small security issue, as other people could point their illegitimate domain names at your site and it would still work and look official.

2. So i didnt have to register all of the aliases, i did not enable ProxyPreserveHost

3. As bryars.eu would resolve to AAAA and A, I didn’t want Apache to get in a loop and proxy to itself, so i added an alias v4 to ensure v4 only forwarding.

For some reason it was sending 301 redirects until the DNS was all sorted

# Contents of /etc/apache2/sites-available/bryars.eu-proxy
<VirtualHost [2001:470:9272:1::2]>
 ServerName bryars.eu
 CustomLog /var/log/apache2/bryars.eu-proxy.log combined

 ProxyRequests Off
 <proxy http://v4.bryars.eu/*>
 Order deny,allow
 Allow from all
 </proxy>
 ProxyPass             /       http://v4.bryars.eu/
 ProxyPassReverse      /       http://v4.bryars.eu/
</VirtualHost>

Also added the IP address to my /etc/network/interfaces so it would get allocated when the tunnel came up, by adding the following line to my tunnel interface stanza:

up ip addr add 2001:470:9272:1::2/64 dev $IFACE preferred_lft 0

The preferred_lft 0 is to mark the ip as deprecated so it doesn’t get used as the default address for outgoing connections. For more information see: http://www.davidc.net/networking/ipv6-source-address-selection-linux

Chili Beer

image

With Chillies in! Yum.

Where: Byres Road Peckhams
Cost: £1.89
Strength: 4.2% Vol
Verdict: Better than expected, light lager with subtle and warming chili taste. Small Bonus for screw top, slightly overpriced. 7/10

The first two bottles had only one chili in, this one has two, same strength of chili flavour though it still feels like winning a little prize.

Debian IPv6 Configuration and Lessons Learned

I’ve had a few issues configuring IPv6 on Debian

If due to a misconfiguration a v4tunnel interface you have brought up with ifup has failed, you need to manually delete it before trying again or this annoying error will happen:


# ifup somev6tunnel
ioctl: No buffer space available
# ip tunnel del somev6tunnel
# ifup somev6tunnel
#

I was trying to configure a 6to4 tunnel but without specifying a local interface address by using local any endpoint any, but that gives an unhelpful and yet increasingly familiar error message.


# ifup 6to4
ioctl: No buffer space available

Linux doesn’t like both local and remote values unset, so I thought, aha I’ll just use local any endpoint 192.88.99.1, it appeared to work. I have since realised that it only works for talking to non 6to4 hosts, if I tried to talk to another 6to4 host, it routed the packets through the gateway instead of directly and the return packets were also lost. So, I just specified the local address and it works.

My working 6to4 debian /etc/network/interfaces


auto 6to4
iface 6to4 inet6 v4tunnel
address 2002:561e:XXXX::1 # ipv6calc -I ipv4addr -O ipv6addr -A conv6to4 86.30.XX.XX
netmask 16
local 192.168.1.2 # address assigned by wifi router
endpoint any
gateway ::192.88.99.1 # 6to4 anycast address

Though its best to use a managed tunnel, like Hurricane Electrics tunnelbroker.net

The is the Debian network interfaces config i used to connect to my tunnelbroker.net ipv6 tunnel, reconfigure the tunnel endpoint dynamically, and also add one of my routed /48 subnets to the interface (so i can use pretty reverse dns addresses from my host).


auto he-ipv6
iface he-ipv6 inet6 v4tunnel
address 2001:470:1f08:xxxx::2
netmask 64
endpoint 216.66.80.26
gateway ::216.66.80.26
# Docs to generate pass etc from http://ipv4.tunnelbroker.net/ipv4_end.php
up wget --no-check-certificate -O - 'https://ipv4.tunnelbroker.net/ipv4_end.php?ipv4b=AUTO&pass=9c4db7a186c8xxxxxxxxxxxxxx&user_id=ef2ffab0c775dxxxxxx&tunnel_id=19xxx' 2>/dev/null
up ip addr add 2001:470:XXXX:1::1/64 dev $IFACE

Barclaycard RFID Exploring

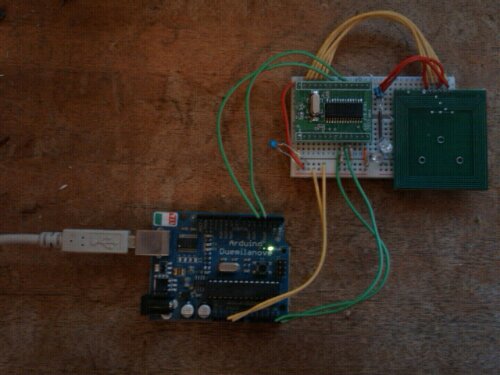
Waived my card over my Arduino Powered SM130 RFID reader to see what it would say..

image

Student Card: Mifare 1K(2) : 2ADEXXXX

Barclay Card: Unknown Tag(FF) : 09A1XXXX

It’s compatible with the usual RFID standards to some degree, enough to give the same serial number every time, unlike my passport which randomises its ID each activation, but not surprisingly it doesn’t read on my basic reader, probably a more advanced one would get further..